Sunday, December 14, 2014

Snowflake Tag and Pocket

Hi!  I wanted to share a quick pocket and tag I made for my toddler.   She said she wanted pink for Christmas so I thought I would try to deliver.

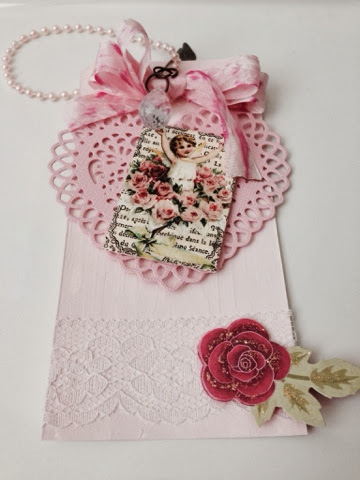
I used the Pocket with Scalloped Edge die by Jillibean Soup for Sizzix for this project.  It's the perfect size pocket to hold a few pencils or goodies for small hands. 


The Snowflake Rosette is from Tim Holtz' line.  I added some 'Spun Sugar' distress glitter to sparkle it up a bit. 


The Pink Christmas Santa papers come from Lorraine's Graphiques Etsy Store found here.  I absolutely adore the image of that little pink Santa.  So cute!

The 'Happy Christmas' stamp comes from Crafty Secrets' Christmas Mail stamp set. Don't forget to enter your project for the December Linky Party as today is the last day. Also be sure to check out the beautiful new Christmas stamp sets Sandy created.


Thanks for looking!

Sunday, November 16, 2014

Wintry Village Snow Globe


Hi, there!  It's time for this month's Crafty Secrets Linky Party.  I am so excited about the new digital stamp sets Sandy is giving away to everyone who participates this month.  The samples she's previewed are just lovely!

I decided to make a snow globe for my entry.


I absolutely adore snow globes but oddly enough, I have never owned one.  Weird, huh? 


I purchased the snow globe card template from The Cutting Cafe but Crafty Secrets has a great stamp set here if you are interested. 


The image itself and the striped paper is from the Crafty Secrets Creating with Vintage Christmas Download.  I just love the wintry scene.  I have never lived anywhere that has a 'good' snow every season and now we are in Arizona...perhaps it's just wishful thinking?


I added some Diamond Stickles to the rooftops and bordered the entire card in Silver Stickles.  

Thanks for looking!

Monday, October 6, 2014

Give Thanks Tag

Hello!  Below is a second entry for this month's Crafty Secrets Linky Party.  My husband poked fun at me for this one because of the honeycomb background, claiming there should be a bee involved instead of a pumpkin!  He's probably right but I like how it turned out regardless.  

The honeycomb was created using Tim Holtz' layering stencils.  I am a novice with them but have really enjoyed the different looks that can be created.  Wild Honey, Rusty Hinge, Mustard Seed, and Walnut Stain distress inks were used to color the background and leaves (cut from Tim Holtz' Tattered Leaves Die).  I used Copper and Gold Paint Dabbers to add a touch of glimmer here and there.  

The two flourish stamps were both from Crafty Secrets.  The one on the top left corner is from their 'Halloween Fun' Stamp Set and the bottom right flourish is from their 'Mini Memories' collection.  


I embellished the pumpkin using Martha Stewart Glitter in Espresso.  The 'Give Thanks' stamp is from Close to My Heart. 


Thanks for looking!


Halloween Ornaments

Hi!  It's time for the Crafty Secrets October Linky Party.  I absolutely love this time of year!  There are so many great projects inspired by the Holidays...I cannot wait to see what everyone comes up with!

I put together a couple of ornaments for our Halloween tree using images from the CS Halloween Digital Download.  These were so simple to make.  I sized the images and then added a little UTEE to gloss them up a bit and protect them while in storage.  I used silver tinsel around the edges to help the images pop againstour black tree and completed each with bows and baker's twine. 


Thanks for looking! 


Sunday, August 17, 2014

Crafty Coasters

Hope everyone is doing well! Just wanted to share another project submission for the Crafty Secrets August Linky Party. Don't forget to play along as each participant will receive one $6.00 gift card and one lucky individual will win $50.00 to their store!

My toddler has really gotten into crafts of late and she adores stamping! So, we pulled out a few coasters I purchased ages ago and decided to have a bit of fun. 


These are no directions for this...just stamp away! So simple and my daughter just adores them. She carries them around and keeps them on her nightstand. Isn't it cute the things kids choose to play with?


The stamps are from various Halloween sets I purchased from Crafty Secrets: Costume Cuties, Halloween Postcard, and Halloween Fun.  All can be purchased here.

Thanks so much for stopping by!

Crafty Secrets August Linky Party

Hello! Here is a quick project I put together for the Crafty Secrets August Linky party. I am so thrilled Halloween is just around the corner. It's absolutely my favorite time of year!

The papers and images are all from the CS Halloween digital download found here. There are so many goodies to choose from but I just love the vintage feel of this little lady!


The various background papers were cut from Spellbinders dies and then adhered to 'homemade' chipboard, a.k.a. cereal boxes.  The bow was cut from a Tim Holtz die.

Thanks for looking and don't forget to participate in this month's Linky party!

Tuesday, March 4, 2014

Easter Trinket Box

Happy Tuesday!  Hope everyone is doing well.  It has been awhile since my last post but I have been going through a pretty rough patch of morning sickness these last couple of months. I will never understand why they call it morning sickness as it can last all day and all night!  This pregnancy has been very difficult physically but thankfully everything is going accordingly with the little one!  I am grateful to be feeling slightly better and to begin crafting again!

Here is a little trinket box I created for the Crafty Secrets Linky Party this month.  I found the box at box Michael's for $.99 and applied two coats of Martha Stewart's Satin acrylic craft paint in 'Pea Shoot'. 


The image is from Crafty Secrets' Adorable Vintage Easter Egg Download.  I inked the edges using Vintage Photo distress ink before adhering to the box. 

Don't forget to join the Crafty Secrets Linky Party.  Each entrant will receive a $6.00 gift card and one lucky individual will win $50.00 to their online store!

Thanks for looking!

Monday, January 20, 2014

Sweetheart Card

Hi! I wanted to share a little card I made. I have been playing around with my Martha Stewart punch around the page punch and have decided I must buy more!


I used Spellbinder's dies for the heart and banner. The flower was cut and rolled by hand. 

Thanks for looking!

Supplies:
Spellbinder's Lace Heart Die
Spellbinders's Lacey Nested Banner Die
Martha Stewart Punch Around the Page
Martha Stewart Alpha Punch
Tim Holtz Walnut Stain Distress Ink Pad
Blue and Ivory cardstock
Hot Glue
3D Foam Squares
 

Tuesday, January 7, 2014

Valentine Tag

Hello,

Below is another project I created for the Crafty Secrets Linky Party.  Don't forget to submit your entries by Sunday night.  Everyone who participates wins a $6.00 gift card and one lucky individual will win $50.00 to their online store.


The image is from Crafty Secrets' Vintage Valentine Digital Kit.  I am so obsessed with this kit.  It has many beautiful images and papers.


I absolutely love my new heart die by Spellbinders. I foresee it being used quite a bit going forward. The tag was painted with acrylic paint and I stained the bow using Spun Sugar.  The rose was a little extra I had lying around my craft area so I apologize for not knowing the brand.

Thanks for looking!

Supplies:
Crafty Secrets Vintage Valentine Digital Kit
Tim Holtz Bookplates and Tag Die
Tim Holtz Trinket Pin and Rings
Spellbinders Lacey Hearts Die
Ranger Crinkle Ribbon
Ranger Spun Sugar Distress Ink
Ranger Diamond Stickles
Ranger Glue 'n Seal
Acrylic Paint
Lace
Bead Ribbon
Trinket Jewel
Paper Rose

To My Fond Love

Good afternoon!  I don't know about you but I am going through Christmas withdrawals.  I am always sad to put away our Christmas decor, especially our tree ornaments.  We collect ornaments each time we visit a new place and every year I enjoy pulling them out and remembering those special times with our family.  It's hard to put them away!

I wanted to share a Valentine card I created for this month's Crafty Secrets Linky Party.  I used their Valentine Digital Download Kit-it has some of the most darling images! The image, the sheet music, and the large pink background paper were all printed from the kit.  I didn't showcase the background paper too much but it is covered in roses. I will have to do another project to feature it as it is simply lovely!


This card was simple to make.  I used several spellbinder dies for the flowers and the frame and applied a paper distress tool on the larger backgrounds.  I free-handed a few Viva 'pearls' for accent. 

Thanks for looking!

Supplies:
Crafty Secrets Vintage Valentine Digital Kit
Spellbinders Bitty Blossoms
Spellbinders Romantic Rectangles
Spellbinders Labels 18
Martha Stewart Heart Punch
Ranger Glossy Accents (adhesive)
Viva Pearls
Ranger Paper Distresser
Pink/Light Pink Cardstock (Hobby Lobby)
Pink Cardstock (Joanne's)
Ivory Cardstock (Michael's)
Silver Thread

Wednesday, January 1, 2014

Gratitude

Hi! Hope everyone had a wonderful Christmas. I can't seem to wrap my head around the fact that it is already New Year's Day.

I wanted to share a card I made.  It was a little time consuming but very simple to create. I used Spellbinders' dies for the background, lattice, frame, and roses.  The leaves and swirls were cut from Sizzix dies.


I used glitter on the flourishes and Stickles on the leaves.  The inside of the card was cut with a Fisker's punch. 


Thanks for looking!  Happy New Year!

Supplies:
Spellbinders Romantic Rectangles Die
Spellbinders Itty Bitty Blossoms Die
Spellbinders Basic Lattice Die
Spellbinders Floral Oval Die
Sizzix Branch with Leaves
Sizzix Elegant Flourishes
Fiskar's Romantique Punch
Fiskar's Clear Many Thanks Stamp Set
Ranger's Diamond Stickles
Martha Stewart Glitter Glue
Martha Stewart Glitter in Feldspar and Lapis Lazuli
Tim Holtz Glossy Accents (Adhesive)
Hot Glue
White Cardstock
Teal Cardstock
Green Cardstock